💻 Simple On-chain Governance Tutorial
In this tutorial you will use Klaytn Contract, Klaytn Contract Wizard and Caver-Js to run a simple on-chain governance. You will learn about how to:
- Create a KIP7 governance token contract that you ll use to cast votes on the governance proposals.
- Create a standard governor contract.
- Create a mintable KIP7 contract that will mint new tokens on the successful execution of the on-chain governance proposal.
1. Prerequisites
- Metamask: Used to deploy the contracts interact with the contracts.
- Remix IDE: Used to compile the contracts and deploy through MetaMask.
- Klaytn Plugin on Remix: develop, deploy, and interact with smart contracts on the Klaytn blockchain and execute various Klaytn-specific transactions
- Test KLAY from Faucet: Fund your account with sufficient KLAY
- Node Js and NPM
2. Create and deploy your KIP7 governance token
In this section, you'll create your simple governance token—the token you will use to vote on proposals in the governance contract.
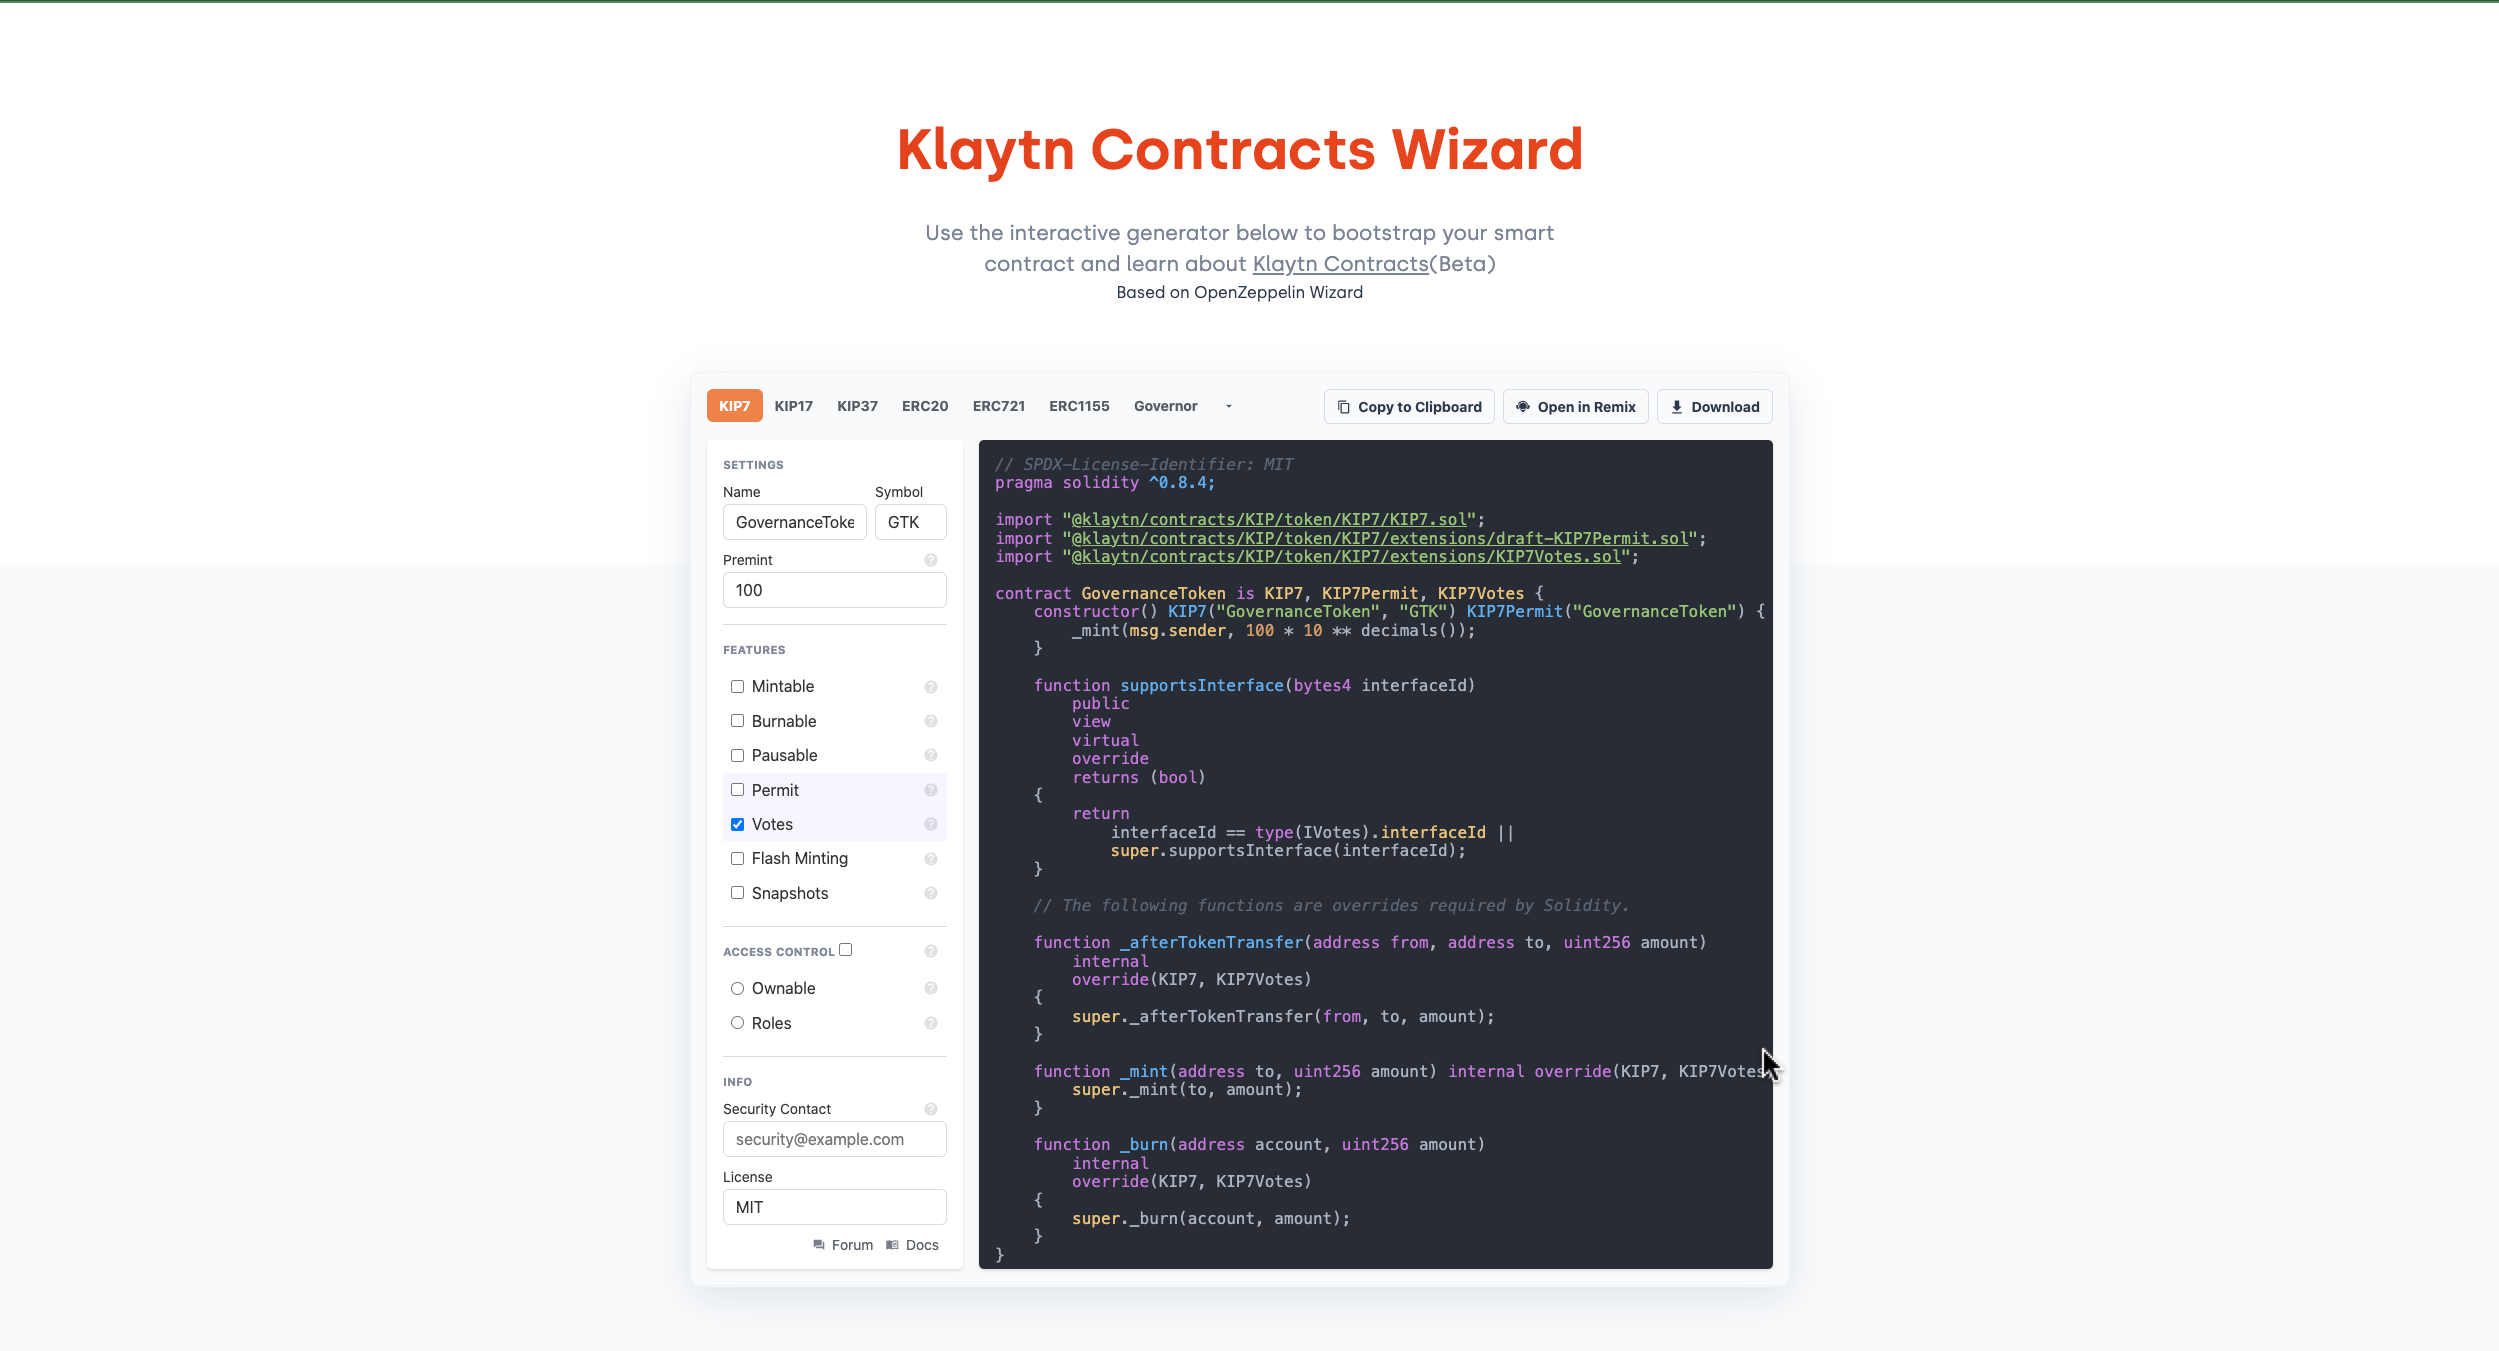
Klaytn Contract Wizard
- Open Klaytn Contract Wizard
- Select KIP7.
- Provide a
nameand asymbolfor the token. For example: GovernanceToken, GTK. - In Premint, provide the number of tokens to issue to your account. For example: 100.
- In Feature, select Votes.
- Click Open in Remix IDE.
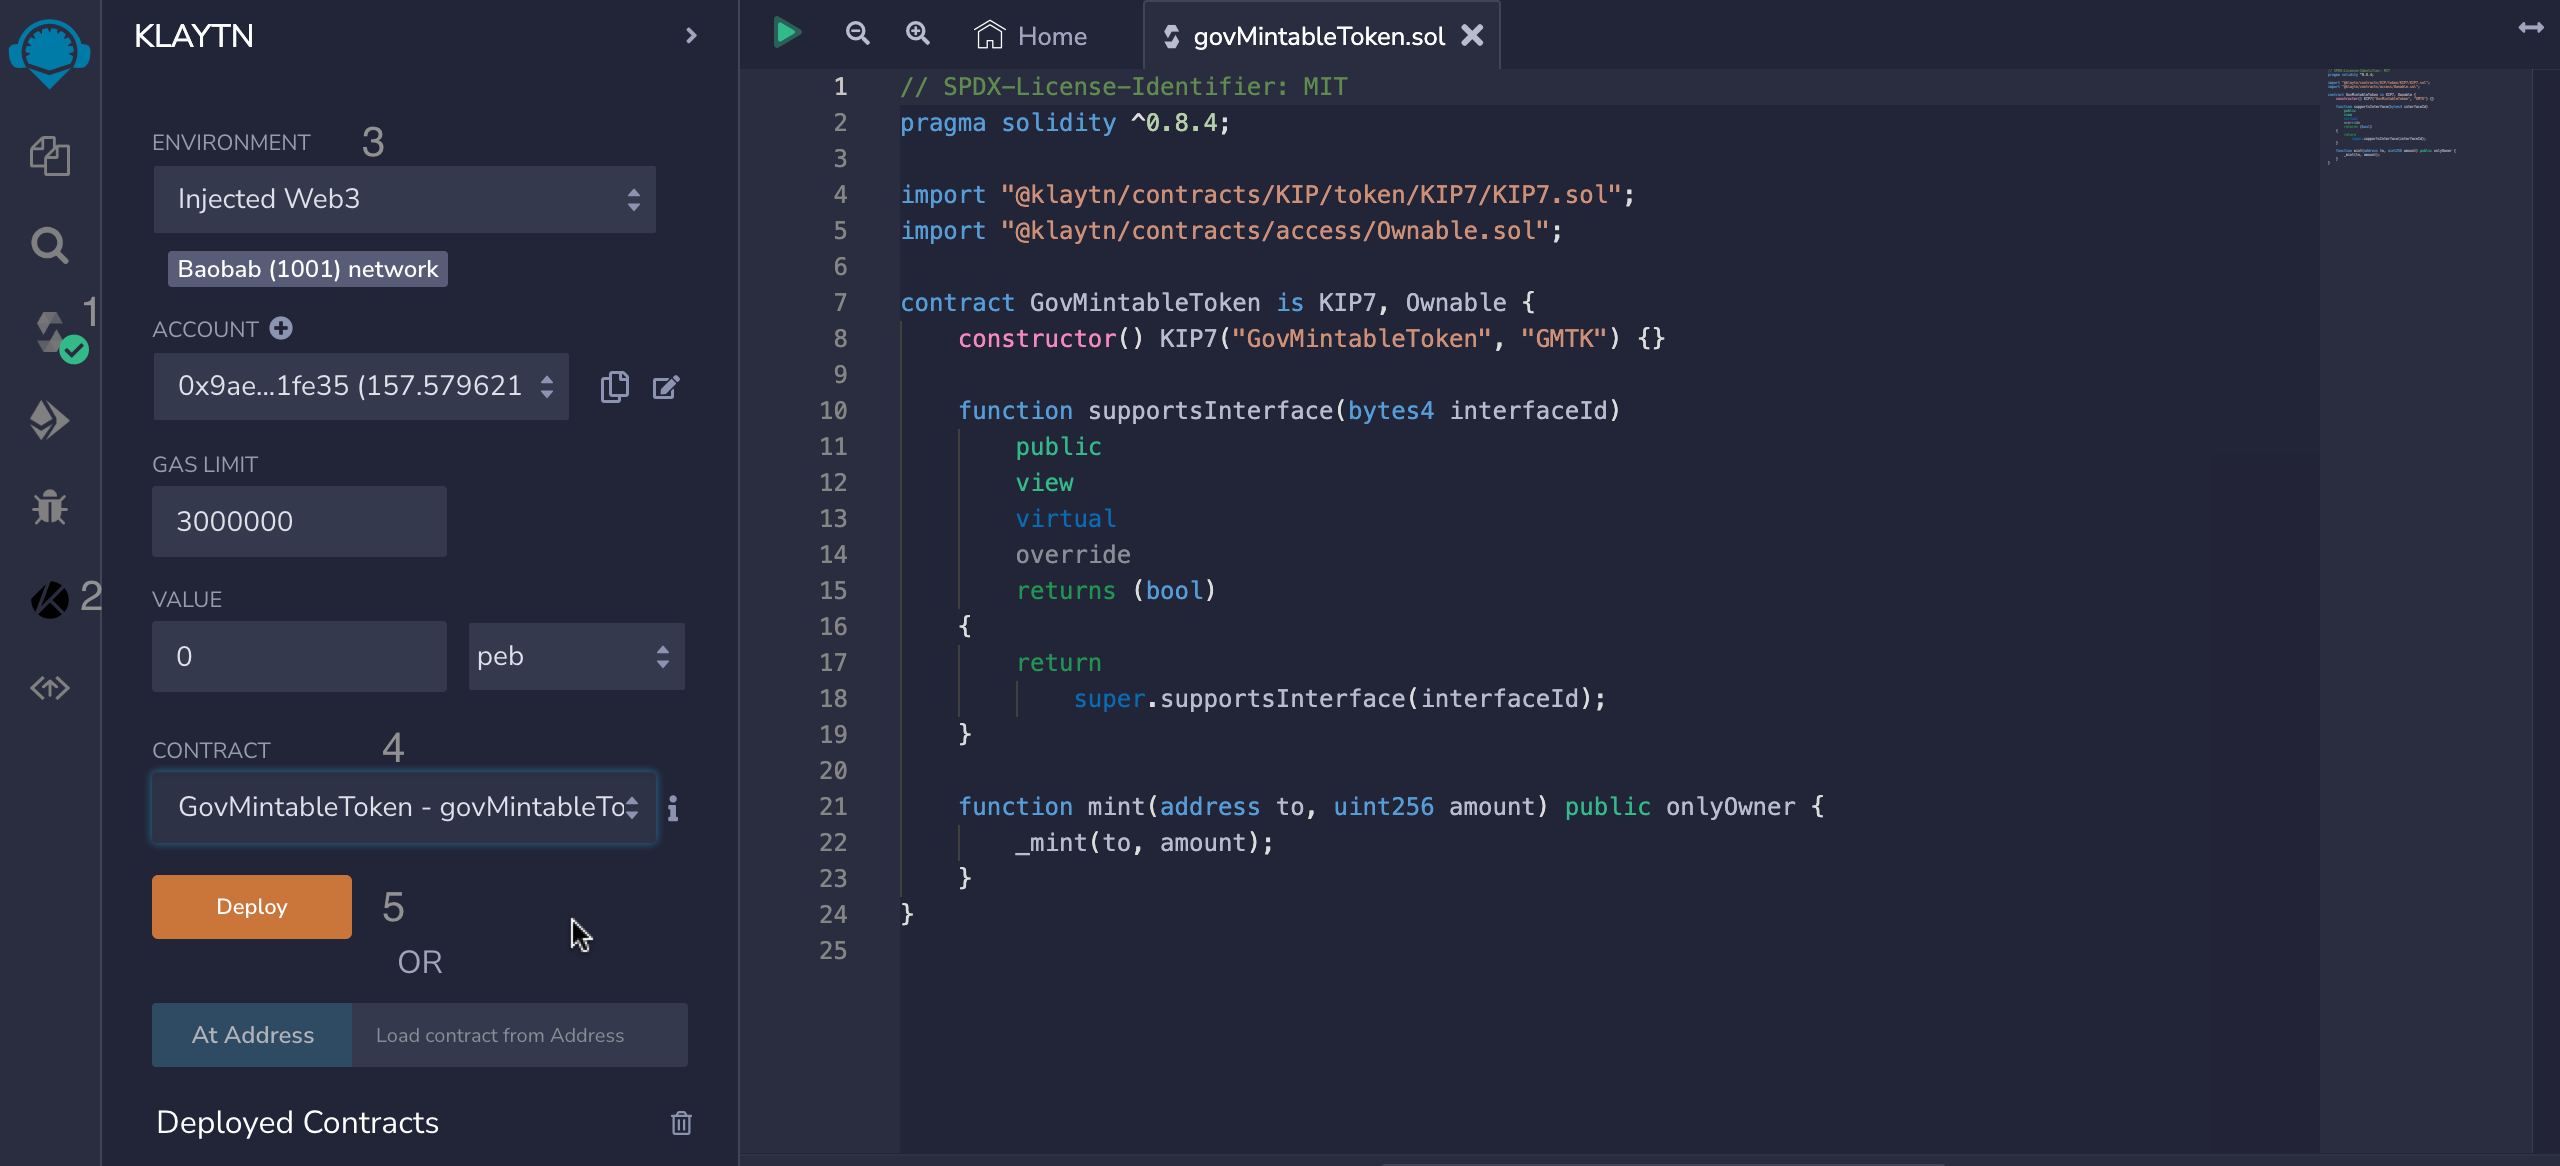
Remix IDE
- In Remix, click Compile contract.
- Click the Klaytn tab on your left having installed the plugin
- Select Environment > Injected Provider - MetaMask.
- In Contract, select your contract. For example, GovernanceToken.
- Click Deploy.
This will engage your MetaMask to deploy the contract to the Klaytn Baobab Testnet through your currently selected MetaMask account. Click Confirm in the MetaMask modal.

3. Create and deploy your KIP-7 mintable token contract
In this section, you'll create a mintable token that will be used by the governance contract to mint tokens on passing the on-chain proposal.
Klaytn Contract Wizard
- Open Klaytn Contract Wizard
- Select KIP7.
- Provide a
nameand asymbolfor the token. For example: GovMintableToken, GMTK. - In Premint, keep 0.
- In Features, select Mintable. Note that this will automatically make the contract Ownable.
- Click Open in Remix IDE.

Remix IDE
- In Remix, click Compile contract.
- Click the Klaytn tab on your left having installed the plugin.
- Select Environment > Injected Provider - MetaMask.
- In Contract, select your contract. For example, GovMintableToken.
- Click Deploy.
This will engage your MetaMask to deploy the contract to the Klaytn Baobab Testnet through your currently selected MetaMask account. Click Confirm in the MetaMask modal.
4. Create and deploy your governance contract
This will be your on-chain governance contract.
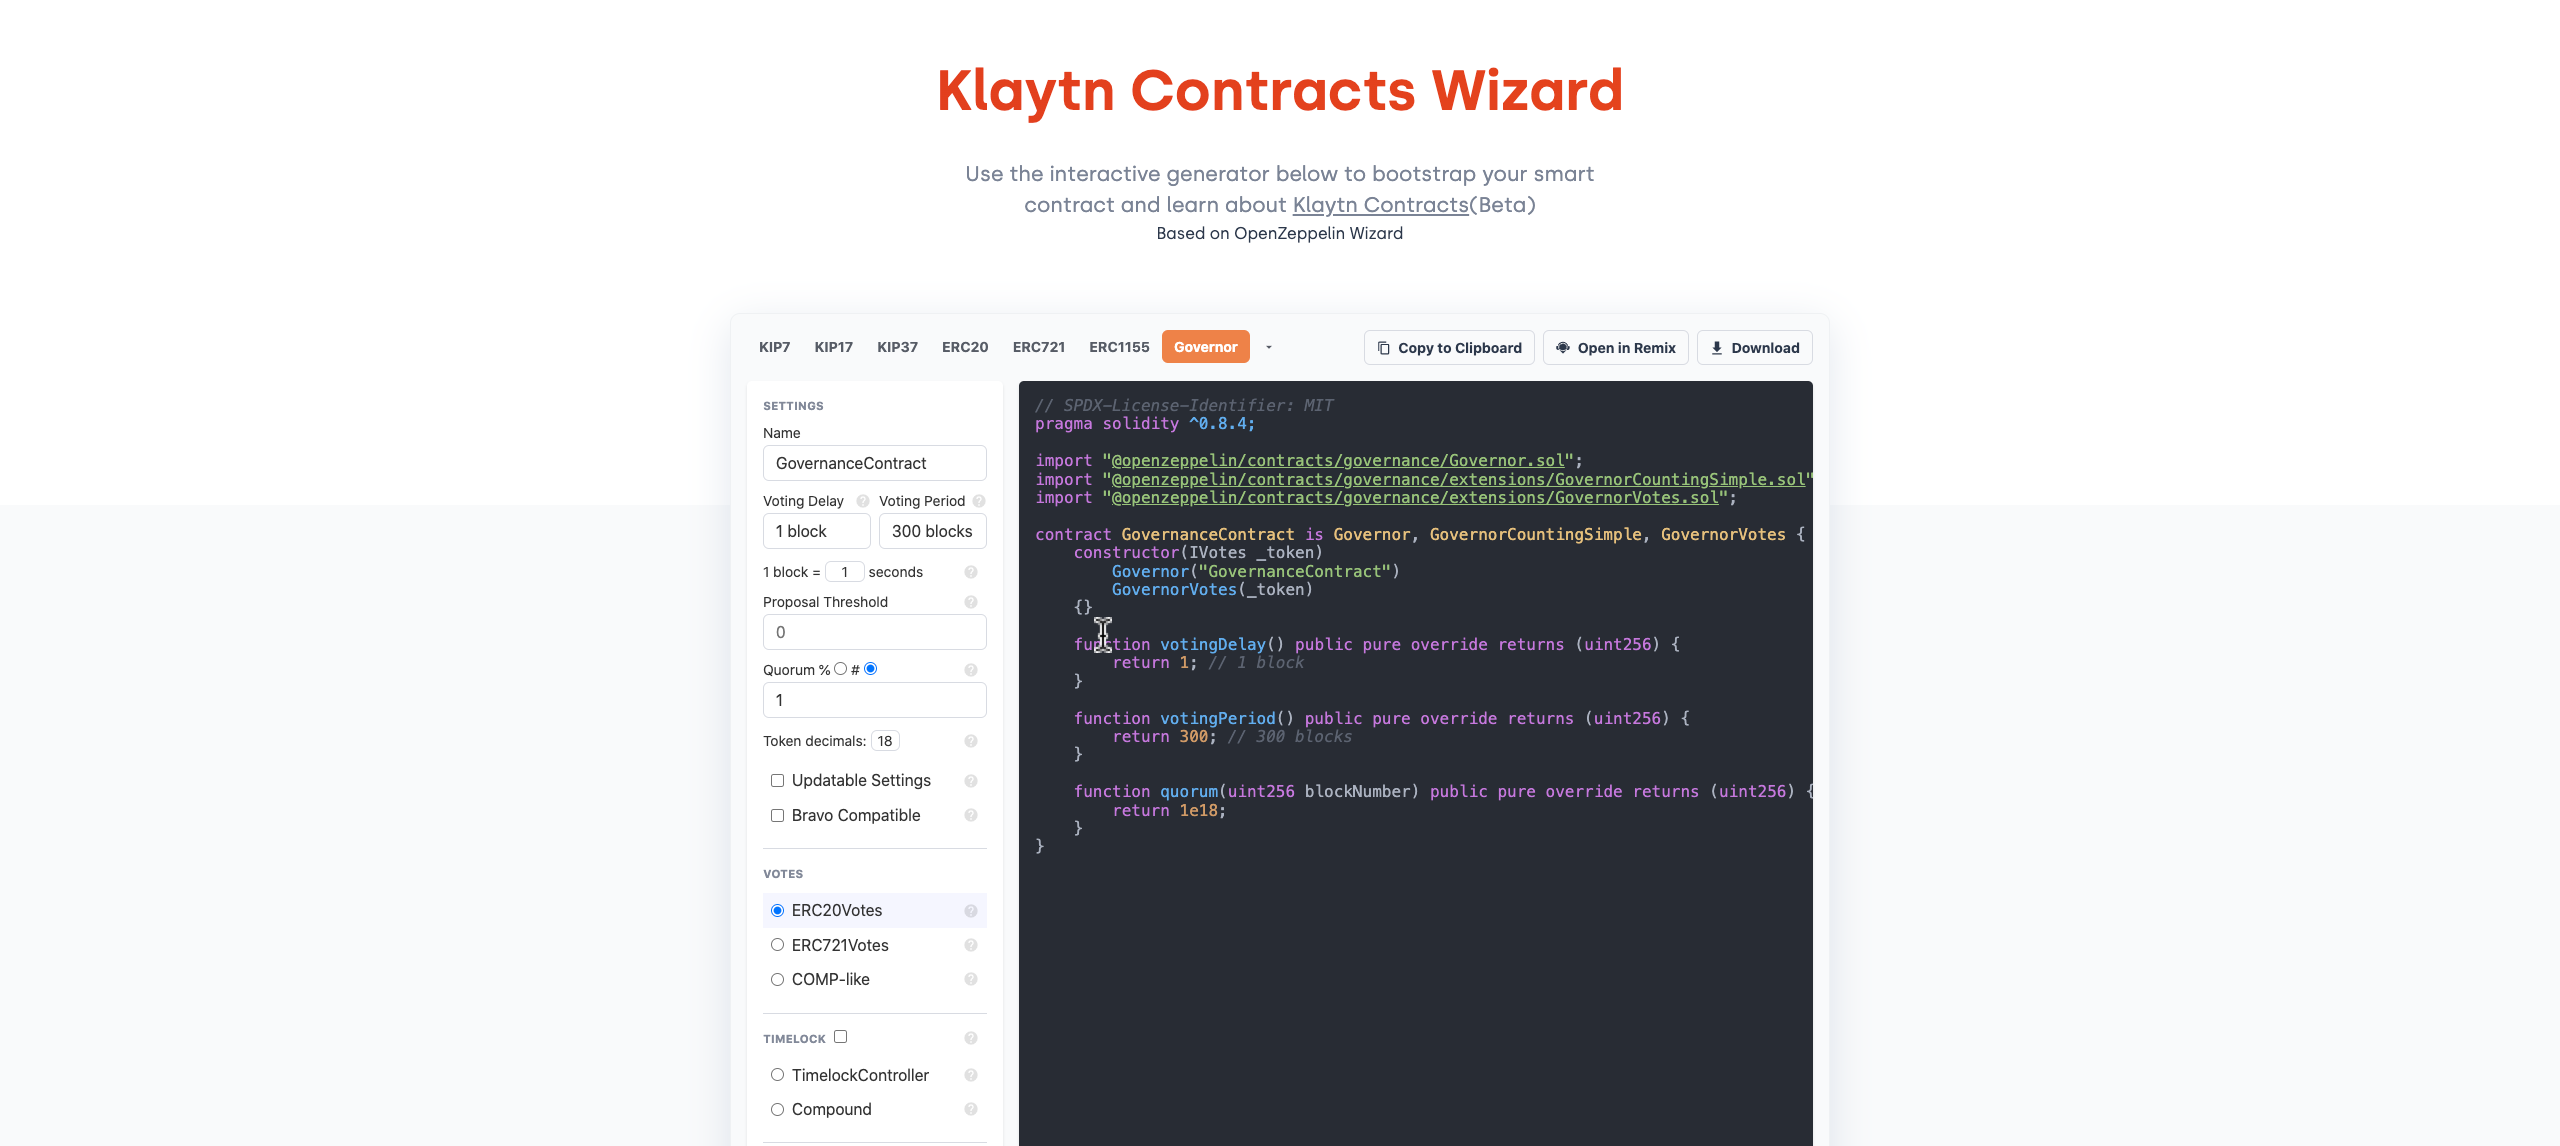
Klaytn Contract Wizard
- Open Klaytn Contract Wizard
- Select Governor.
- Provide a
nameand asymbolfor the token. For example: GovernanceContract. - In Voting Delay, keep 1 block. In the Voting Period, put 300 blocks. In 1 block =, put 1 second. This will be about 5 minutes for a voting period.
- In Quorum, switch to # and put 1 to make the quorum of 1 participating account pass the proposals.
- Remove the Updatable Settings check mark.
- In Votes, select ERC20Votes.
- Remove the Timelock check mark.
- Click Open in Remix IDE.
Remix IDE
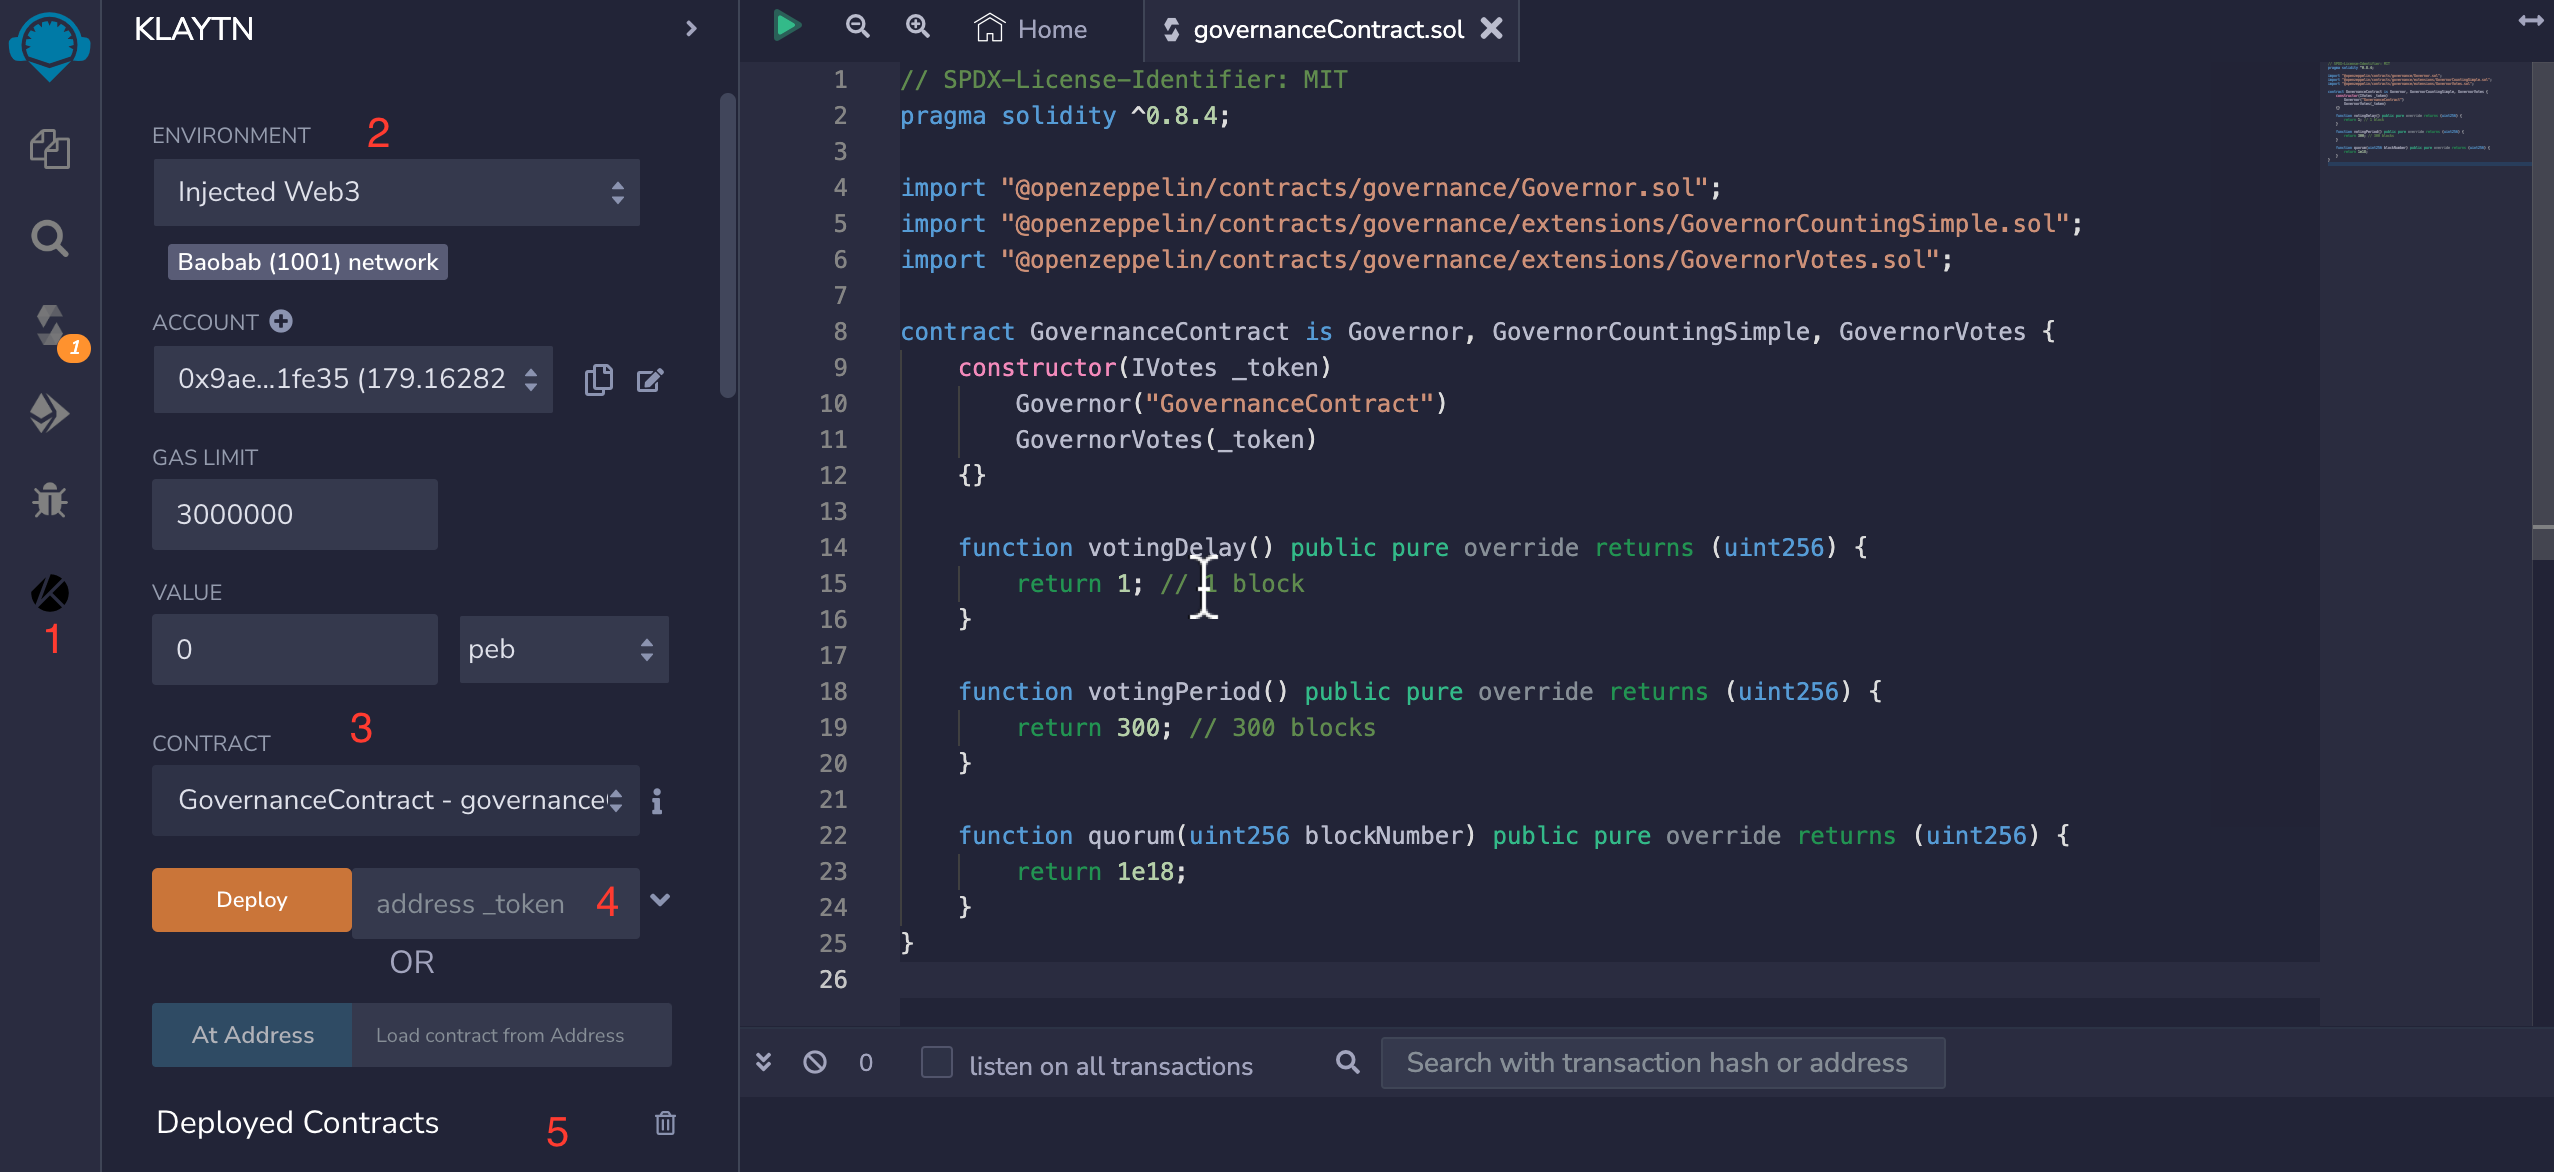
- In Remix, click Compile contract.
- Click the Klaytn tab on your left having installed the plugin.
- Select Environment > Injected Provider - MetaMask.
- In Contract, select your contract. For example, GovernanceContract.
- In Deploy, provide the address of the KIP-7 governance token that you deployed as the first contract of this tutorial. This will make the deployed contract recognize the KIP-7 token as the contract's voting token.
- Click Deploy.
This will engage your MetaMask to deploy the contract to the Klaytn Baobab Testnet through your currently selected MetaMask account. Click Confirm in the MetaMask modal.
5. Interacting with governance smart contract functions
To successfully interact with all already deployed contracts, you'll need to install caver-js like we already did in previous KIP7 tutorial, you can visit this step if you have not installed caver js or skip it if otherwise.
After installing caver-js, you will need to follow these steps.
Set up ABI folder
Create a new folder in the abi folder called governance. Create the following file in this new folder to paste each contract ABI
governanceToken.jsongovtMintableTokenContract.jsongovernanceContract.json
To get your contract ABI, you will need to:
- Navigate to Remix, click on each governance contract.
- Click the Solidity Compiler tab on your left.
- Copy ABI Contract > ABI.
Create your Scripts
Create a new file named governance.js in the scripts folder.
Initialize your script like this
// Interact with governanceToken contract with caver-js

// Import caver.js and each governance contract ABI
const Caver = require('caver-js')
const governanceTokenABI = require("../abi/governance/governanceToken.json")
const governanceMintableTokenABI = require("../abi/governance/govtMintableTokenContract.json")
const governanceContractABI = require("../abi/governance/governanceContract.json")

// Initialize caver.js and the each governance contract
const caver = new Caver('https://api.baobab.klaytn.net:8651/')
const governanceTokenAddr = "<PASTE GOVERNANCE TOKEN CONTRACT ADDRESS>";
const governanceMintableTokenAddr = "<<PASTE GOVERNANCE MINTABLE TOKEN CONTRACT ADDRESS>>";
const governanceContractAddr = "<PASTE GOVERNANCE CONTRACT ADDRESS>";


const contract = caver.contract.create(governanceTokenABI, governanceTokenAddr);
const govtMintableContract = caver.contract.create(governanceMintableTokenABI, governanceMintableTokenAddr);
const governanceContract = caver.contract.create(governanceContractnABI, governanceContractAddr);

// Create and add keyring
// Provide the private key of the address that deployed each governance contract in this tutorial
const keyring = caver.wallet.keyring.createFromPrivateKey("<PASTE YOUR PRIVATE KEY>")
caver.wallet.add(keyring)
Execute Scripts
The perform an on-chain governance on the Klaytn Baobab testnet we need to go through the following steps
a. Delegate the votes
You have preminted the KIP7 governance token to the account you deployed the contract with. As the governance token owner, you now need to delegate the voting power to an account. For simplicity, you can delegate it to your account:
To see this in action, paste the following snippets of code into your governance.js scripts file
// function to delegate
//  provide an account to be able to cast votes in the governance contract.
const delegateAccount = async (delegatee) => {
    contract.send({from: keyring.address, gas: 1500000, value: 0}, 'delegate', delegatee)
    .then(receipt => {
        console.log(receipt);
    })
    .catch(err => {
        console.log(err);
    })
}

// check delegates
const  checkDelegates = async (addr) => {
    contract.methods.delegates(addr).call()
    .then(result => {
        console.log(result);
    })
 }

 const delegatee = "<PASTE YOUR ACCOUNT>";
delegateAccount(delegatee);
checkDelegate(delegatee);
Output
Run the code below in your terminal to see the transaction result
node scripts/governance.js
After successfully executing this transaction, you should call the checkDelegates function. This function returns your delegatee address instead of an address zero.
Transfer the KIP7 mintable contract ownership to the governance contract
The KIP7 mintable contract is ownable. To be able to mint the tokens through the governance contract, you need to transfer the ownership of the ERC-20 contract to the governance contract.
To see this in action, you need to get your governance contract address. Paste the following snippets of code into your governance.js scripts file
// Transfer the contract ownership
// Your governance contract can now mint the ERC-20 tokens.
const transferOwnership = async () => {
    const newOwner = "<PASTE GOVERNANCE CONTRACT ADDRESS>"; // governance contract
    govtMintableContract.send({from: keyring.address, gas: 1500000, value: 0}, 'transferOwnership', newOwner)
    .then(receipt => {
        console.log(receipt);
    })
    .catch(err => {
        console.log(err);
    })
}

// check new owner
const  checkNewOwner = async () => {
    govtMintableContract.methods.owner().call()
    .then(result => {
        console.log(result);
    })
 }

transferOwnership()
checkNewOwner()
Output
Run the code below in your terminal to see the transaction result
node scripts/governance.js
After successfully executing this transaction, you should call the checkNewOwner function. This function returns the newOwner address which should be the governance contract address.
b. Create a proposal
At this point, you have three contracts deployed:
- An KIP7 governance token contract with preminted tokens assigned to your account.
- An KIP7 mintable token contract owned by the governance contract.
- The governance contract to run proposals.
It is now time to create your proposal.
First, get the call data that the governance contract takes as a proposal to execute. For this tutorial, the call data is minting the KIP7 tokens to an address and an amount to mint: mint(address to, uint256 amount).
To get the call data:
- Go to the online ABI encoding service
- In Enter your parameters manually, select:
- Function > your function > mint.
- Argument > Address > the address to mint the tokens to.
- Argument > Uint256 > the amount of tokens to mint in 18 decimal units. See Ethereum unit converter

- Copy the resulting data and precede it with 0x. This is your call data to mint the tokens. In my case my call data looks like this
40c10f19000000000000000000000000d124727d4b5e868602b7e834aeed66f53fa7db7b0000000000000000000000000000000000000000000000008ac7230489e80000
Now create the actual proposal.
In propose, provide your proposal details:
- In targets, provide the address of your KIP7 mintable token.
- In values, provide the amount of KLAY that should be deposited with the proposal. Typically, it is 0.
- In calldatas, provide the call data that you acquired.
- In description, provide any description let’s say “First Proposal”.
Once the proposal transaction is confirmed, the contract will emit an event that contains the proposal ID. You will need the proposal ID to vote for the proposal and to execute the proposal.
Paste the following code in your governance.js to create proposal
// Propose
// create the actual proposal on the governance contract.
const propose = async () => {
    const target = ["<PASTE GOVERNANCE MINTABLE TOKEN CONTRACT ADDRESS>"] // KIP7 Mintable Token Contract Address
    const values = ["0"]
    const calldata = ["<PASTE YOUR CALL DATA>"]
    const description = "First Proposal";


    governanceContract.send({from: keyring.address, gas: 1500000, value: 0}, 'propose', target, values, calldata, description)
    .then(receipt => {
        console.log(receipt.events.ProposalCreated.returnValues.proposalId);
    })
    .catch(err => {
        console.log(err);
    })
}

propose()
Output
Run the code below in your terminal to see the transaction result
node scripts/governance.js
After successfully executing this transaction, it returns the proposalId which will be used to cast a vote next

c. Cast your vote
At this point, you have:
- A running proposal.
- You have the proposal ID.
- You have the voting power delegated to your account.
To cast your vote:
- In
castVote, provide your vote:- In proposalId, paste the proposal ID.
- In support, provide your voting decision: 0 is against, 1 is for, 2 is abstain. For the proposal to pass, vote 1.
This will create a transaction that casts your vote
Paste the code below in your governance.js to cast your vote given your proposaIId
// Cast vote
// This will create a transaction that casts your vote
const castVote = async () => {
    const proposalId = “<PASTE PROPOSALID>”;
    const support = "1";

    governanceContract.send({from: keyring.address, gas: 1500000, value: 0}, 'castVote', proposalId, support)
    .then(receipt => {
        console.log(receipt);
    })
    .catch(err => {
        console.log(err);
    })
}

castVote()
Output
Run the code below in your terminal to see the transaction result
node scripts/governance.js
You have casted your vote after a successful execution of the transaction.
d. Execute passed Proposal
Once the proposal is voted on and the voting period (5 mins) reaches the deadline, the proposal is passed. You can now execute the passed proposal.
To execute:
- In
execute, provide details:- In targets, provide the address of your KIP7 mintable token.
- In values, provide 0 for the amount of KLAY.
- In calldatas, provide the same call data that you generated earlier for the function mint(address to, uint256 amount).
- In descriptionHash, provide the hash of the description that you used to generate the proposal. To do this the easy way, go to an online Keccak-256 generator and paste your description text, copy the result and precede it with 0x.

In this case, the descriptionHash looks like this:
0x5972eb28939b3d790b6661496564aa3a329cbfbc0dd087bf9377a66ba43a809f
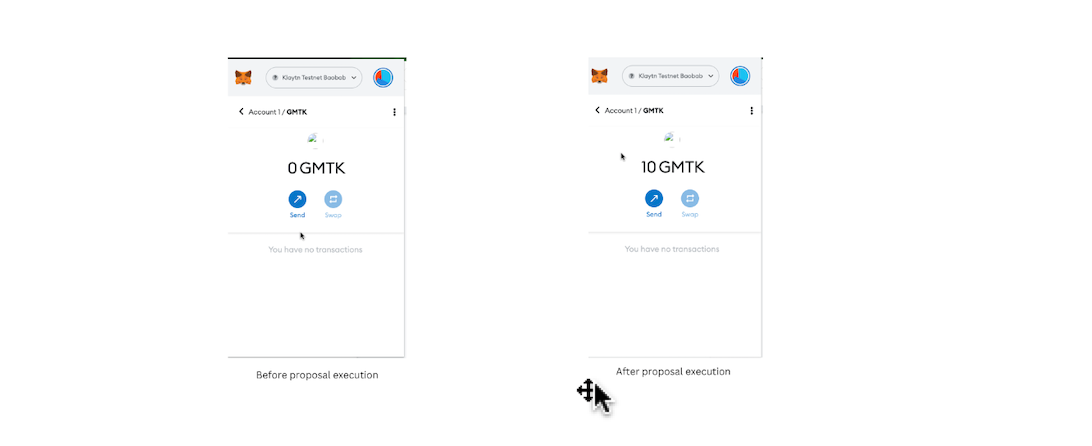
This will execute the passed proposal and the governance contract will mint the KIP-7 mintable tokens to the account that you provided in the call data when creating the proposal.
// Execute Passed Proposal
// Will execute the passed proposal on the governance contract
const executeProposal = async () => {
    const target = [“<PASTE GOVERNANCE MINTABLE CONTRACT ADDRESS>”] // KIP7 Mintable Token Contract Address
    const values = ["0"]
    const calldata = [“<PASTE CALLDATA HERE>”]
    const descriptionHash = “<PASTE DESCRIPTION HASH HERE>”;


    governanceContract.send({from: keyring.address, gas: 1500000, value: 0}, 'execute', target, values, calldata, descriptionHash)
    .then(receipt => {
        console.log(receipt);
    })
    .catch(err => {
        console.log(err);
    })
}

executeProposal()
Output
Run the code below in your terminal to see the transaction result
node scripts/governance.js
After successfully executing this transaction, new tokens will be minted to the address specified in your calldata.
Congratulations on performing your on-chain governance successfully. You can find the full implementation of the script file on Github
6. Conclusion
This tutorial guided you through the basics of creating and deploying a set of DAO contracts to mint KIP7 tokens through on-chain governance on the Klaytn Baobab testnet. You have also interacted with the contracts using Caver-js, MetaMask, Klaytn-Contract Wizard to run the full cycle governance process.
If you have any questions, please join our Discord server, or send us an email at developers@klaytn.foundation